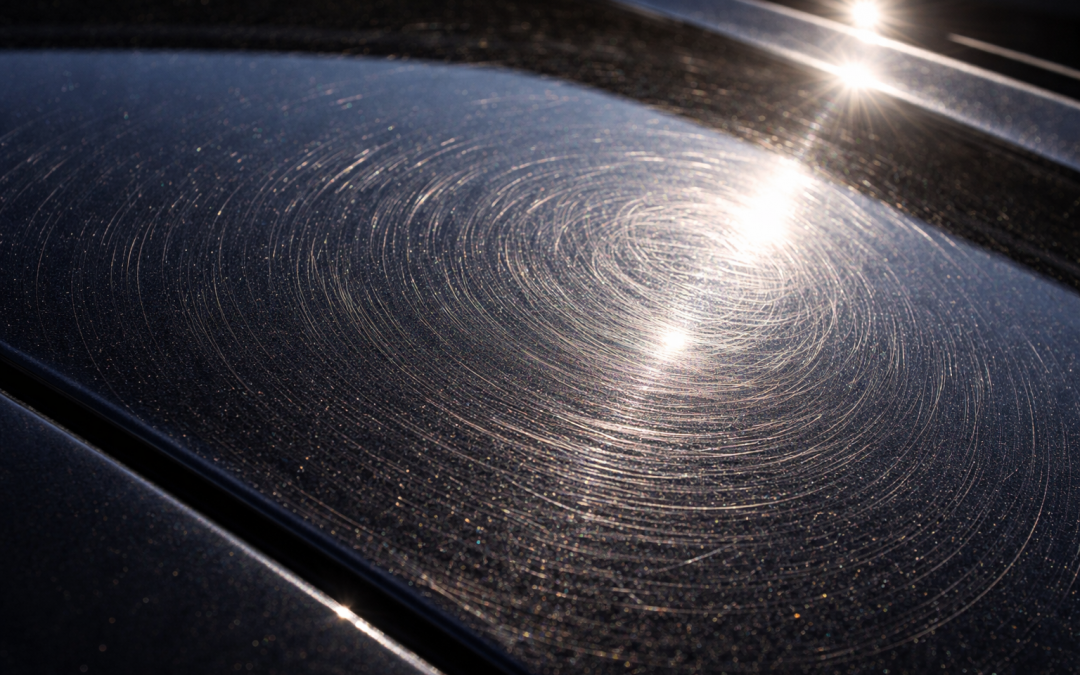
You just finished washing your car. The sun hits the hood, and there they are—hundreds of fine, circular scratches catching the light like spiderwebs across your paint. If you’ve noticed swirl marks after a car wash, you’re dealing with one of the most common (and most frustrating) paint problems Sacramento drivers face.
Here’s what most car care advice gets wrong: the problem usually isn’t the wash itself. It’s what touched your paint during the wash—and what that towel or mitt was carrying when it did.
Once you understand how swirl marks actually form, preventing most of them becomes straightforward. And if your paint already looks like it lost a fight with a buffer, there’s a clear path to getting it smooth and clear again.
What Swirl Marks Actually Are
Swirl marks are microscopic scratches in your vehicle’s clear coat—the transparent protective layer that sits on top of your base paint. They earn the name “swirls” because they typically appear as circular or semi-circular patterns, most visible when direct sunlight or bright artificial light hits the surface at an angle.
These scratches are a form of micro-marring: shallow enough that you can’t feel them with your fingernail, but deep enough to scatter light and dull your finish. [1] Over time, thousands of these tiny scratches accumulate. Even on a dark-colored vehicle that looked glossy a year ago, that buildup creates a hazy, aged appearance that no amount of washing will fix.
The frustrating part? Most swirl marks happen during cleaning—when you’re actively trying to make your car look better.
Why Car Washes Create Swirl Marks
Creating a scratch in clear coat requires only two things: pressure and particles. Every time something touches your paint while carrying even microscopic dirt or debris, it drags that grit across the surface. Clear coat is softer than most people assume, and it doesn’t take much to leave marks. [2]
The Grit Problem
Sacramento’s Central Valley location means vehicles here pick up agricultural dust, road grime, and airborne particulates faster than cars in many other regions. That contamination has to go somewhere during a wash—and if it’s not lifted away before contact, it becomes the abrasive that damages your paint.
Automatic car washes use brushes or cloth strips that contact hundreds of vehicles daily. Those materials pick up dirt, sand, and road grime from every car before yours. When they spin across your paint at high speed, they’re essentially buffing contamination directly into your finish. [3]
Hand washing with poor technique can be just as damaging. A single pass with a dirty wash mitt—or wiping your paint with a towel that picked up grit from your driveway—creates the same circular scratching pattern you’d see from an automatic wash.
Drying with the wrong materials is one of the most overlooked causes. Once your wash soap is rinsed away, there’s no lubrication left. Dragging a dry chamois or worn-out towel across that surface creates friction, and any trapped particles become tiny sandpaper.
The Hidden Culprit: Dirty Towels and Wash Media
This is where most swirl mark prevention advice misses the mark.
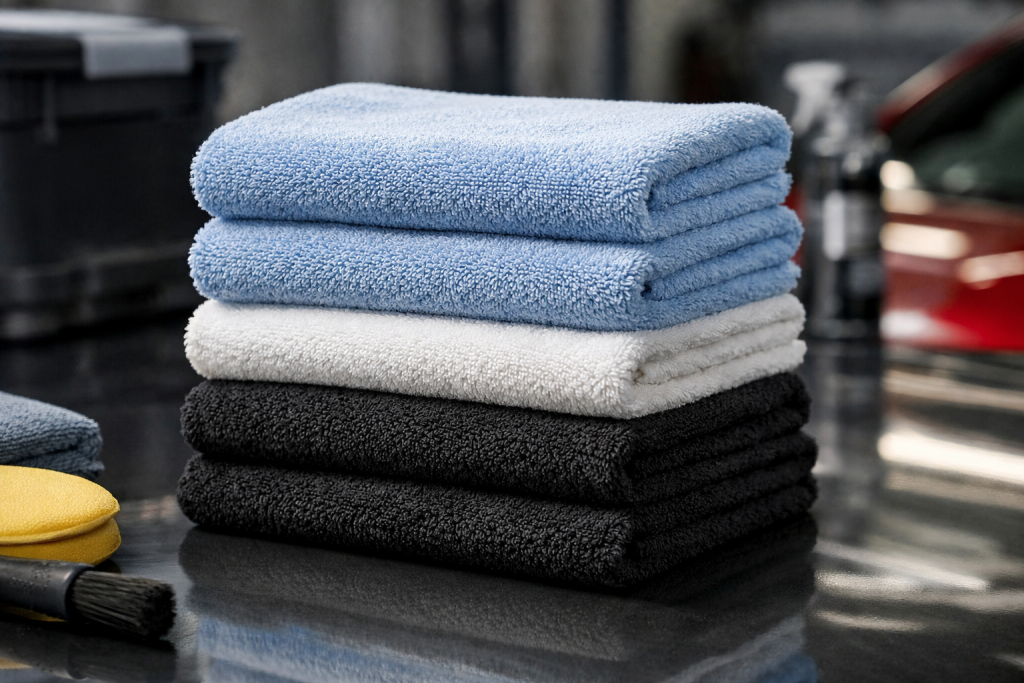
Even if you hand wash at home with proper technique, your towels and wash mitts can betray you. A microfiber towel that looks clean may still hold embedded grit in its fibers from previous uses. Washing your car with that towel means you’re rubbing yesterday’s contamination across today’s paint. The same goes for wash mitts, drying towels, and detailing cloths.
The problem compounds when towels are washed incorrectly. Fabric softeners coat microfiber fibers and reduce their ability to trap dirt safely—the particles sit on the surface instead of being captured deep in the fibers. Washing towels with other laundry, especially anything with zippers, buttons, or heavy soil, introduces new contaminants that get pressed into the microfiber during the dryer cycle. [4]
If you’re creating swirl marks at home despite using good technique, your wash media is the first place to investigate.
How to Prevent Swirl Marks
Prevention is always easier than correction. Here’s a practical approach that actually works for Sacramento drivers dealing with valley dust and hard water.
Choose the Right Wash Method
Touchless automatic washes eliminate brush contact entirely, though they’re less effective at removing heavy contamination. For vehicles that pick up significant valley dust, a touchless wash may not fully clean the paint—but it also won’t grind that dust into your clear coat.
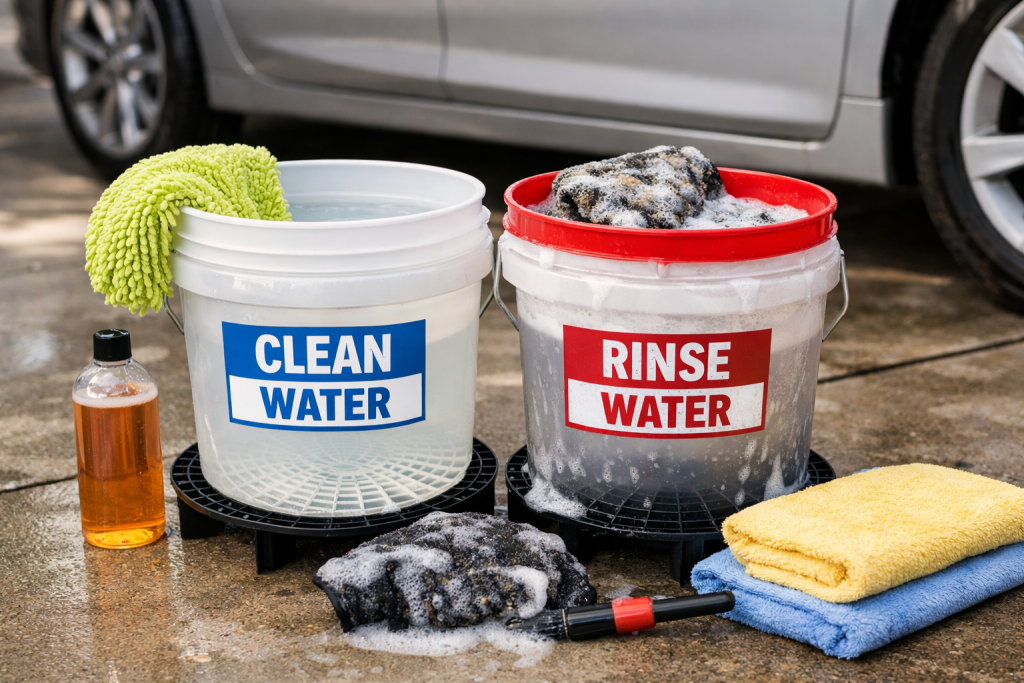
Hand washing with the two-bucket method keeps dirty water separate from clean water, reducing the chance of dragging grit back across your paint. One bucket holds your wash solution; the other holds clean rinse water for your mitt.
Foam cannons or pre-rinse techniques lift dirt before any contact happens, minimizing abrasion during the wash itself. A heavy foam layer encapsulates loose particles and lets them rinse away before your mitt touches the surface.
Maintain Your Wash Media
| Item | Maintenance Rule | Why It Matters |
| Microfiber wash mitts | Rinse thoroughly after each panel; replace when fibers feel stiff or matted | Stiff fibers can’t trap grit safely—they drag it across the paint instead |
| Drying towels | Wash separately with no fabric softener; inspect for embedded debris before each use | Fabric softener clogs fibers and reduces absorbency, leaving particles on the surface |
| Detailing cloths | Keep different towels for different tasks; never use a wheel towel on paint | Brake dust and wheel grime are highly abrasive and will scratch clear coat immediately |
| All wash media | Store in sealed containers away from dust and garage debris | Open storage allows airborne contamination to settle into fibers between uses |
Master Your Drying Technique
Drying is when many swirl marks actually happen because the lubrication from wash soap is gone and the paint surface has more friction.
Use a dedicated drying towel with high absorbency—look for plush, high-GSM microfiber designed specifically for drying. Pat and blot rather than dragging the towel across the paint. If you need to wipe, use a drying aid or quick detailer as lubricant to reduce friction.
For a completely touchless dry, consider a filtered water rinse (which reduces mineral spotting) or an air blower to push water off panels without any contact. Sacramento’s hard water leaves mineral deposits that bond to paint if not removed quickly, and scrubbing at water spots later is a fast path to swirl marks.
How to Fix Existing Swirl Marks
If your paint is already swirled, prevention alone won’t restore it. The only way to remove micro-marring is through paint correction—a controlled polishing process that levels the clear coat and removes the damaged layer.
Understanding Paint Correction
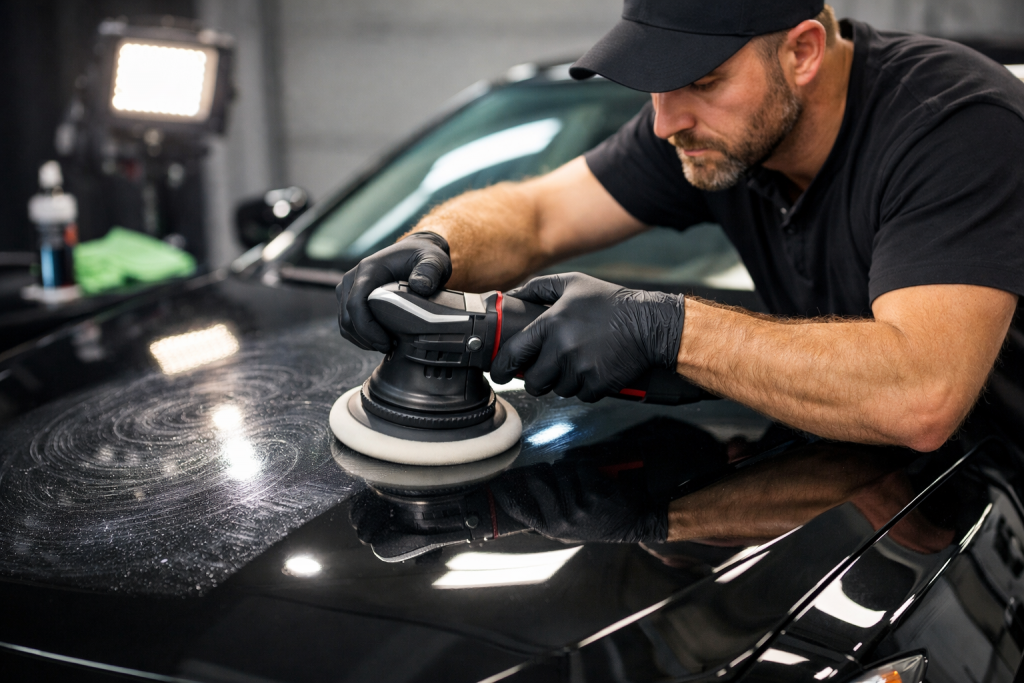
Paint correction uses abrasive polishes and machine polishers to gradually remove a thin layer of clear coat, taking the scratches with it. The process requires skill because removing too much clear coat weakens your paint’s protection permanently. [5]
Before any polishing begins, the paint surface must be fully decontaminated. A clay bar treatment or chemical iron remover pulls out embedded contamination that washing alone can’t reach. Skipping this step means the polisher will grind existing contaminants into the clear coat, potentially creating new damage while you’re trying to fix the old.
There are different levels of correction depending on how severe the damage is:
- Light polish or single-stage correction addresses minor swirling and restores gloss in one pass
- Multi-stage correction tackles deeper scratches, oxidation, and heavy marring through progressively finer polishing steps
- Wet sanding is reserved for severe defects and requires professional expertise to avoid burning through the clear coat
DA Polishing: The Safer Approach
Professional detailers typically use dual-action (DA) polishers rather than rotary buffers for most correction work. DA polishers oscillate and rotate simultaneously, which distributes heat more evenly and significantly reduces the risk of burning through the paint. [6]
This makes DA polishing safer for most vehicles while still delivering excellent results on swirl marks and light scratches. It’s the standard approach for removing wash-induced micro-marring without creating new problems like holograms or buffer trails.
DIY vs. Professional Correction
Light swirls can sometimes be improved with consumer-grade DA polishers and finishing polishes. However, there are good reasons to trust this work to a professional:
Clear coat thickness varies by manufacturer and previous correction history—pros use paint depth gauges to know exactly how much material they can safely remove without compromising protection.
Technique matters as much as equipment. Improper polisher movement, wrong pad selection, or incorrect speed creates holograms and new marring that can look worse than the original swirls.
Product selection depends on your paint hardness, defect severity, and desired finish. What works on soft German clear coat may not cut through harder Japanese paint, and vice versa.
Time investment for proper correction is substantial—a full vehicle can take many hours to do correctly, with careful attention to each panel.
For Sacramento drivers dealing with swirl marks, adding a light polish or paint reconditioning during your next professional detail is often the most efficient solution. The vehicle is already being handled, the surfaces are clean and decontaminated, and the detailer can assess exactly how much correction is needed for your specific paint condition.
Protecting Your Paint After Correction
Once swirl marks are removed, protecting that fresh finish makes sense. Without protection, you’re starting the damage cycle over again immediately.
Paint sealants create a sacrificial layer between your clear coat and environmental contamination. They’re easier to maintain than bare paint and provide months of protection against UV damage and chemical exposure.
Ceramic coatings bond chemically to the clear coat and offer longer-lasting protection with better resistance to chemical etching and UV degradation. They also make washing easier because dirt releases more readily from the slick, hydrophobic surface—which means less contact and less pressure during future washes. [7]
Wax provides the shortest-duration protection but adds gloss and can be reapplied easily at home between professional details.
One important point: protection doesn’t prevent contact damage from improper washing. A ceramic coating won’t stop a dirty towel from scratching your paint. What protection does is guard against chemical and environmental degradation, make cleaning easier and safer, and preserve the correction work you invested in.
The Prevention + Correction Path
Here’s the practical approach that works long-term:
- Assess your current paint under direct light to see how much swirl damage exists
- Get professional correction if the marring is moderate to severe—this resets your baseline to clean, defect-free clear coat
- Add protection (sealant, coating, or wax) to preserve the corrected finish and make future maintenance easier
- Improve your wash routine with proper media maintenance, correct technique, and attention to drying
- Schedule maintenance details to address minor marring before it accumulates into a bigger problem
This approach treats swirl marks as a solvable problem rather than an inevitable consequence of vehicle ownership. Most Sacramento drivers who follow this path end up with better-looking paint than they’ve had in years—and they keep it that way.
Ready to get rid of those swirl marks for good? Ask about adding a light polish or paint reconditioning to your next detail. Our certified detailers can assess your paint’s condition and recommend exactly the level of correction your vehicle needs—no more, no less. Book your detail today or contact us with questions about paint correction options.
Frequently Asked Questions
Can swirl marks be removed permanently?
Yes. Paint correction physically removes the damaged layer of clear coat, eliminating the scratches rather than filling them temporarily. Once removed, those specific swirl marks are gone for good. However, new swirl marks can form if improper washing continues, which is why combining correction with better wash habits and proper media maintenance delivers lasting results.
Do all automatic car washes cause swirl marks?
Brush and cloth-based automatic washes carry the highest risk because their contact materials accumulate grit from previous vehicles throughout the day. Touchless automatic washes avoid this contact entirely, though they may struggle with heavy contamination like Sacramento valley dust. If you use automatic washes regularly, touchless options are significantly safer for your paint.
How often should I replace my microfiber towels?
Replace wash mitts and drying towels when fibers become matted, stiff, or visibly worn—typically after several months of regular use. Inspect towels before each wash for embedded debris or damage. Proper washing (no fabric softener, separate from other laundry) and sealed storage extends their lifespan, but holding onto degraded towels to save money costs far more in paint correction later.
Is ceramic coating worth it after paint correction?
For many drivers, ceramic coating makes sense after correction because it extends the life of that investment. The coating creates a harder, more chemical-resistant surface that’s easier to wash safely and maintain over time. Whether it’s “worth it” depends on how long you plan to keep the vehicle, your willingness to maintain proper wash habits, and your budget for ongoing care.
Can I fix swirl marks myself with a DA polisher?
Light swirling can often be improved with consumer-grade DA polishers and appropriate finishing polishes. However, without experience reading paint condition, measuring clear coat thickness, and using proper technique, you risk creating holograms, over-polishing thin areas, or simply not achieving noticeable improvement. For moderate to severe swirls, professional correction is usually the more reliable and cost-effective path.
About Our Expertise
The Detail Pros Sacramento brings years of professional detailing experience to Sacramento-area drivers, with certified detailers trained in paint correction, polishing techniques, and protective coating application. Our team handles everything from routine maintenance details to multi-stage paint reconditioning, helping vehicle owners understand exactly what their paint needs and delivering results that last. We take pride in quality workmanship and straightforward guidance—because professional detailing should make car care easier, not more complicated.
Cited Works
[1] International Detailing Association — “Understanding Clear Coat Damage and Micro-Marring.” https://www.the-ida.com/page/ClearCoatDamage
[2] Chemical Guys — “What Causes Swirl Marks in Car Paint?” https://www.chemicalguys.com/blogs/knowledge-base/what-causes-swirl-marks
[3] Consumer Reports — “Are Automatic Car Washes Bad for Your Car’s Paint?” https://www.consumerreports.org/cars/car-maintenance/are-automatic-car-washes-bad-for-your-car/
[4] The Rag Company — “How to Wash Microfiber Towels: The Complete Guide.” https://www.theragcompany.com/blogs/news/how-to-wash-microfiber-towels
[5] Auto Geek — “Paint Correction: The Complete Guide to Removing Swirl Marks.” https://www.autogeek.net/paint-correction-guide.html
[6] Rupes USA — “Dual Action vs Rotary Polishers: Which Should You Use?” https://www.rupesusa.com/blogs/guides/dual-action-vs-rotary-polishers
[7] SEMA — “Ceramic Coatings: What Vehicle Owners Should Know.” https://www.sema.org/news-media/magazine/2019/ceramic-coatings-explained

 and then